Do you use the Scrivener program for your writing? Many writers do, especially as Scrivener sponsors NaNoWriMo and offers a discount to participants. I started using Scrivener for my NaNo drafting last year and was able to buy the program at half-off because of my NaNo win. Woo hoo!
Many writers like Scrivener (Windows and Mac) for its organizational features. They can lay out their scenes with virtual index cards, capture their research information, and create character sheets, all in one program.
Honestly, I use about 1% of Scrivener’s capabilities and have probably forgotten more than I remember about it. Part of my issue is I haven’t used it for ebook formatting yet. But part of it is because I write by the seat of my pants.
I don’t bother putting my research or notes into the program as I draft (I currently use MS OneNote for most of that). And my pantsing ways means that I don’t do a lot of planning—much less plotting—ahead of time.
Yet I’m also a source of beat sheets popular with plotters. Go figure.
Last week, Samir Ramos asked me on Facebook if I had any tricks for using Scrivener with beat sheets. That’s a great question, so I wanted to share some of what came out of that discussion here.
I’m going to reiterate that I am not an expert in Scrivener, so there might be easier and/or better ways to do what I’ve done. I’d love to hear about other methods in the comments so I can learn too. *smile*
Pretty vs. Not: Beat Sheets vs. Scrivener
Many writers don’t like dealing with math. *raises hand* The beat sheets on my site all have “auto-math.” We fill in the estimated word count of our story and all the word counts of the beats—the story events—will automatically populate. Yay! No math.
Scrivener (as far as I know) doesn’t have a function for calculating how many words each section should contain based on assigned percentages of the total word count. (If I’m wrong, someone please correct me.) Simply put, Scrivener’s a word processing application, not a math-based spreadsheet.
That means any target word counts in Scrivener have to be calculated and entered manually. Not pretty.
The Choice: Doing Math or Bouncing between Programs
So what are our choices? Even as a pantser who doesn’t fill out beat sheets ahead of time, I still like vaguely keeping track of my word count while I draft so I stay on track. Sometimes when I’ve been stuck on what to write next, I’ve discovered my muse wasn’t giving me any ideas because it was time to do the scene for the next beat. Huh.
We could fill in our expected word count in our beat sheet in MS Excel and keep an eye on our overall word count in the Scrivener Project Targets word count window (in the Windows version, this is under the Projects menu).

Every so often, we could simply compare that number under Manuscript Target (where the example above says 81) to the word counts on our beat sheet and call ourselves done.
Or we could get more complicated and enter the word count breakdowns for each beat into Scrivener. That requires math. *grin*
A Basic Scrivener Template for a Basic Beat Sheet
A couple of months ago, I created the Basic Beat Sheet and shared it here on my blog. Although I don’t fill out beat sheets before drafting, I often have general ideas in my head for at least some of the basic beats:
- Inciting Incident
- End of the Beginning
- Pinch Point #1
- Midpoint
- Pinch Point #2
- Crisis
- Climax
- Resolution
I created a basic template with folders matching those same beats, which I use when drafting new novels. I haven’t shared this template before because it’s really basic, but maybe it will help someone. If you write in linear order (writing scenes in the final order of the story), it might be easier to bounce between programs.
However, many writers who use Scrivener take advantage of its ability to easily create, reorder, and tweak story flow to write scenes out of order. Especially during NaNo, writers might jump to another scene that’s flowing rather than stay stuck on the next linear scene. For those writers, seeing how the word count for each beat is shaping up in Scrivener might be invaluable because the total word count won’t do them any good during drafting.
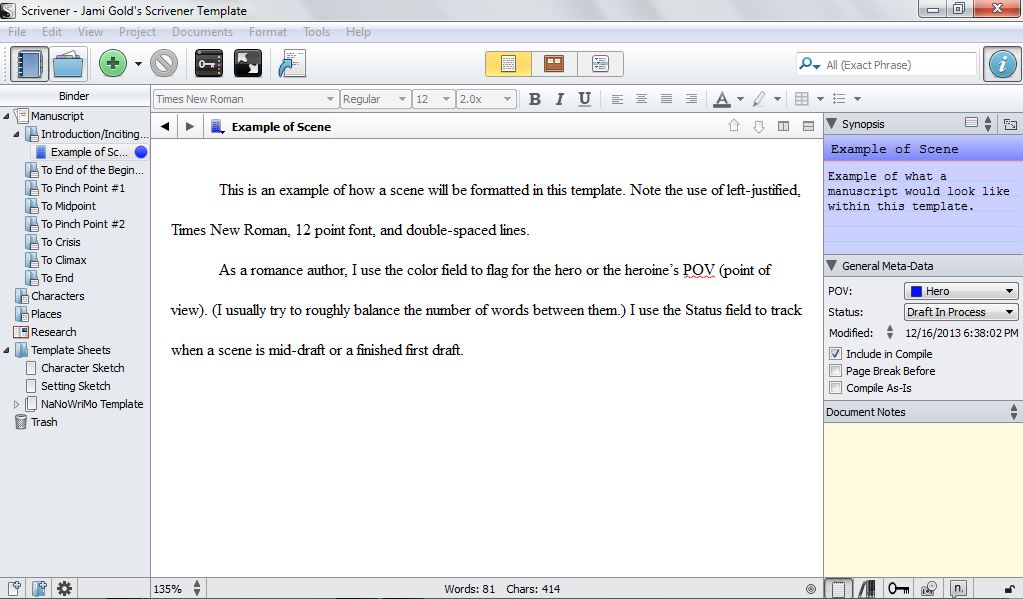
(Click on the image to view larger size.)
If you click on the image, you’ll see those same 8 beats represented by folders on the left side of the screen. I tuck each new scene into the appropriate folder as I draft. That simple step helps me see how many scenes I have leading up to each beat.
(Note: If you write romance, I have a Scrivener template to go along with my Romance Beat Sheet as well.)
(Note: I built this template off of the NaNoWriMo template, so it still includes the character and setting sketch templates, even though I don’t use them. Also, this template uses the Label field to flag for point of view (POV), which might be useful for romance authors or other multiple-POV authors. Others might want to change that field to setting, main plot vs. subplot, scene type, etc.)
Now for the math part…
Step One: Customize a Beat Sheet for Our Word Count
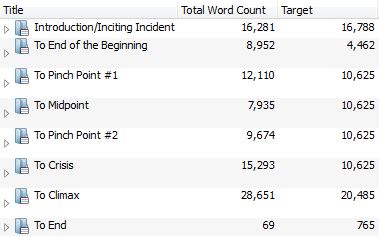
In my genre, a normal word count is 80-100K words. I set up my beat sheet and my Scrivener template for 85K because I always go over, so I figure it’s best to aim for the low end when I draft.
If I open the Basic Beat Sheet and change the Word Count in the header section to 85,000, the results would look like this:

Step Two: Calculate the # of Words for each Beat’s Section
Notice the numbers for each beat on the far right under Word Count above. The Inciting Incident is easy, 16788 words. After that, we have to figure out the difference in word count between each beat and the one before it. For example, the End of the Beginning would be 21250 minus 16788, or 4462 words, Pinch Point #1 would be 31875 minus 21250, or 10625 words, and so on.
Step Three: Enter the Target # of Words for each Section
Once we have the numbers for how our total word count breaks down into each beat’s “section,” we can input that information into Scrivener.

If you’re not familiar with this view in Scrivener, you click on “Manuscript” on the top left (under Binder) and then on Outliner view (the right-most middle button at the top, yellow in this image).
Under View—>Outliner Columns, we can select what information we want to see here. In this template, I have Title (the beat/folder name), Synopsis (what’s supposed to happen in that beat), Total Word Count (this is the actual word count for all scenes added to that folder), and Target (these are the numbers we calculated in Step Two) displaying as columns.
Double click on the numbers under Target to update for your Step Two word counts. If anyone knows an easier way to set up any of these steps, please let me know in the comments.
Step Four: Do Not Freak Out while Drafting!
Now while we’re drafting, we can keep on eye on our progress. However, this does not mean we should panic if our actual word counts under Total Word Count don’t match. *smile*
- We already have enough other things to worry about while we’re drafting. We don’t need to add tracking every single over or under word count to that list.
- We’ll change those word counts a lot during revision. Trust me. We’ll delete tangents, tighten sentences, add deeper emotional responses, flesh out settings and descriptions, and bring out our themes.
- The word counts of beat sheets are guidelines. Story flow is more important than sticking to these numbers. The main purpose behind beat sheets is to ensure a story arc unfolds with good pacing. The specific numbers don’t matter if the pace is strong.
- We might discover better beats while we’re drafting. This happens to me all the time. I think plot event A is going to be the Pinch Point, but it happens too early. Instead, when I look at what’s going on around the target word count, I discover another event that works just fine as a Pinch Point. Problem solved.
- We might end up with a manuscript word count nowhere near our expected word count. As I mentioned, I plan for 85K words, but I often end up closer to 105K.
For example, I’m not quite done with my current work-in-progress, but I’m at 99K right now. Here are how those actual vs. target numbers look in one of my first drafts:
Once I’ve completed my first draft, I’ll update the Basic Beat Sheet for that real total Word Count number. Then I can look at the scenes near those updated word count numbers for each beat and decide if I have a pacing problem or not.
So rather than worrying about specific word counts while drafting, think of these folders and numbers simply as organizational tools. They remind me to avoid tangents, and they keep me from trying to brainstorm another scene when I really should be working on the next beat. The word counts are just an overview for me.
(As a side note in case anyone’s curious, I currently transition to MS Word for revisions. I’m more comfortable doing editing in MS Word, and my beta readers are able to use Track Changes/Comments for their feedback in that program.)
Interested in this Basic Scrivener Template?
(Note: I have Scrivener for Windows. From what I’ve heard, this template might work on the Mac version. UPDATE Mac Users: These instructions are focused on Window, but check this comment, this comment, and this comment with tips from my readers for Mac-specific advice.)
- Click here to download a zip file of the Scrivener template.
- After downloading is complete, select the zip file and extract the template file (Jami Gold Template.scrivtemplate) to someplace accessible, like your Desktop. (Try right-clicking the zip file and selecting Extract.)
- Open Scrivener.
- If the Project Templates window doesn’t open automatically, select
File—>New Project - Click on Options in the bottom-left of the New Project window.
- Select “Import Templates…”
- Find where you moved the Jami Gold Template.scrivtemplate file and select/open the file.
- Jami Gold’s Template will now be available as an option in the “Fiction” section of the template chooser every time you start a new project.
Let me know if you have any questions. Gwen Hernandez has a great collection of Scrivener tips on her site and offers several classes. And please share your resources and tips in the comments. *smile*
(And if you write romance, check out my Romance Scrivener Template based on my Romance Beat Sheet.)
Do you use Scrivener? If so, do you track word count beat-sheet style? Do you have any other advice or tips for tracking word counts by beat? Do you use a Scrivener template? If so, which one and why? What are some of your favorite Scrivener features?